WEEK15 <<
Previous Next >> Final Report
WEEK16
1.Onshape 零組件繪製
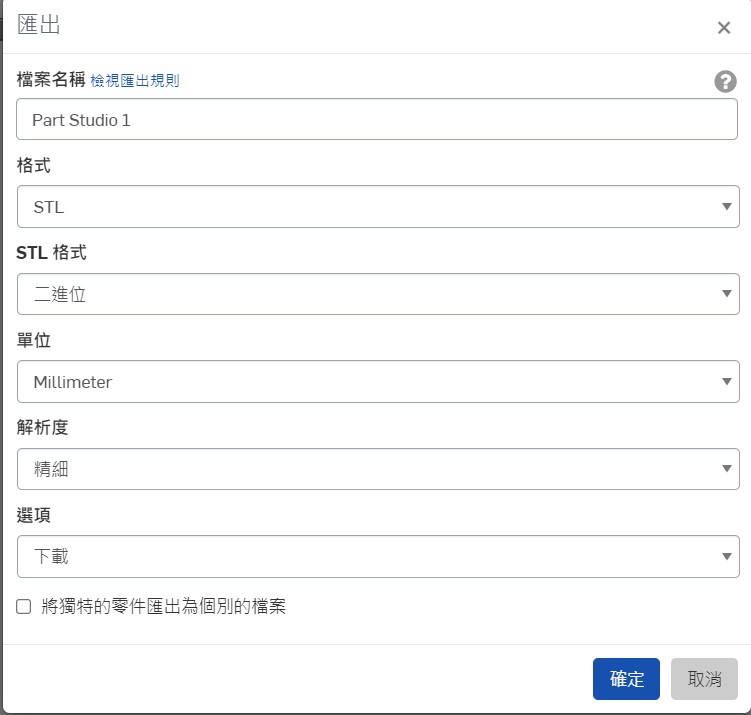
點選所繪製的零件-匯出

並將檔案設定為STL檔-單位為mm-解析度為精細
圖檔連結:
https://cad.onshape.com/documents/15e83407d80dfa73cd0a79b4/w/708c36c519f886a7cf619237/e/8ab38e3393432ffc8ab92eae
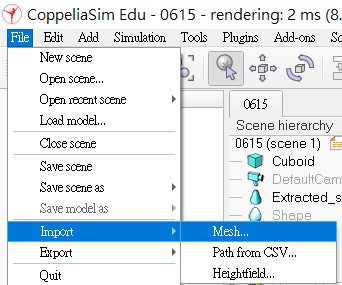
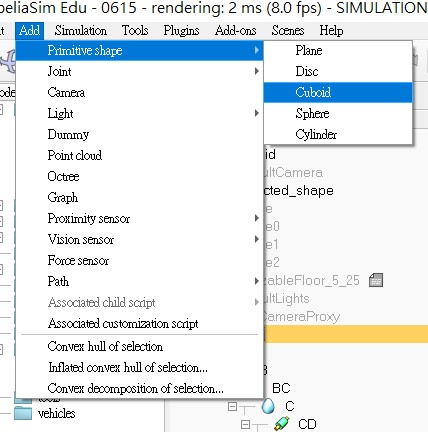
2.建立 CoppeliaSim 4.1.0 MTB robot 場景
選擇File-Import-Mesh將檔案匯入
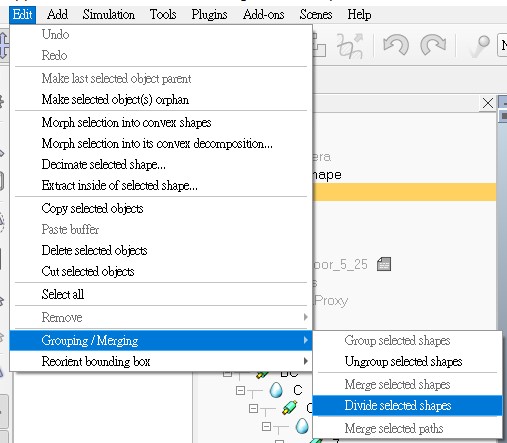
選擇Edit-Grouping-Divide selected shapes 將檔案拆解方便定位軸
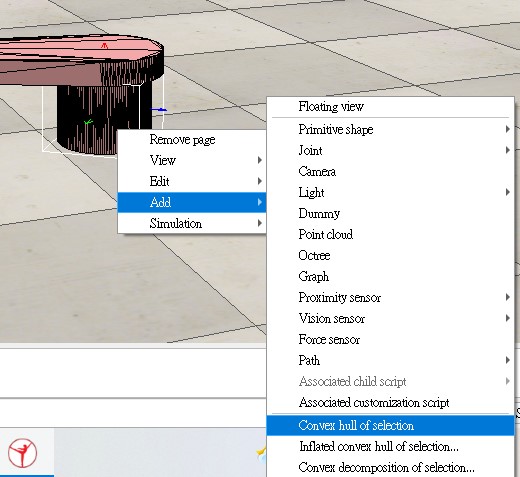
點選零件Add-Comvex hull of selection將檔案曲線精密化
點選零件-toggle shape 進行零件區域選取-選完點extract shape
這個方法可以將物件拆解產生新的區域

先點軸-再點物體-點選移動物件-再點Position進行軸的定位
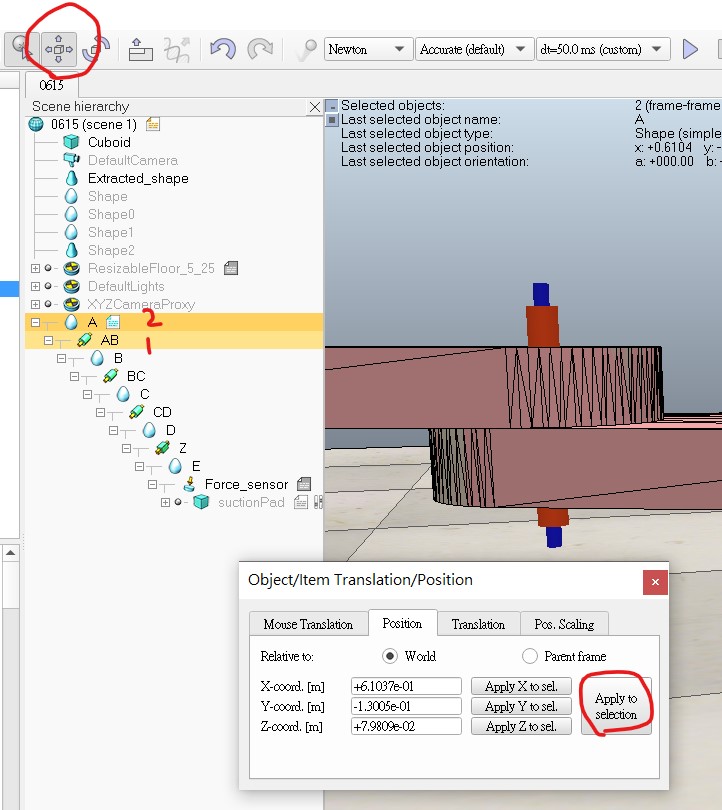
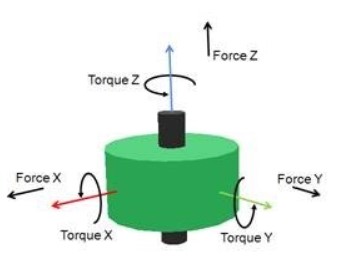
Force sensor是一個力傳感器可以同時測出三個方向和力矩

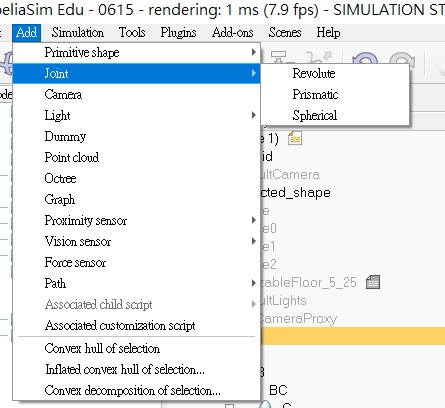
Revolute-選轉的軸
Prismatic-上下移動的軸
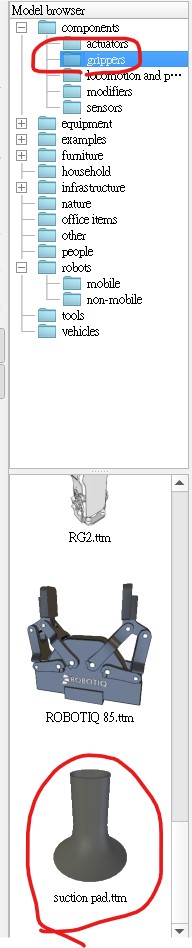
grippers可以點選吸盤
Cuboid為長方體
2.建立 CoppeliaSim 4.1.0 MTB robot 場景
影片連結:
https://youtu.be/1oJov8iJlvw
W16_exam雲端連結:
https://drive.google.com/drive/folders/1xdaI_OUvxgJNPPZhEz4KEd7s1sIHOJBq?usp=sharing
鍵盤控制的部分沒有完成,只有建立場景,鍵盤控制的程式碼還需要時間研究
3.手臂末端加入 components-gripper-suction pad 吸盤
影片連結
4.逆向運動學函式
影片連結:
function moving(x,y)
a=0.5
b=0.5
c=math.pow((math.pow(x,2)+math.pow(y,2)),0.5)
s=(a+b+c)/2
area=math.pow((s*(s-a)*(s-b)*(s-c)),0.5)
h=area/(2*c)
deg1_base=math.atan(x/y)
if x<0 and y<0 then
deg1_base=deg1_base+math.pi
end
deg1_tri=math.asin(h/a)
deg1=deg1_base+deg1_tri
deg2=math.pi-(0.5*math.pi-deg1_tri)-math.acos(h/b)
deg3=deg2-deg1
sim.setJointTargetPosition(AB,deg1)
sim.setJointTargetPosition(BC,-deg2)
sim.setJointTargetPosition(CD,deg3)
end
function sysCall_threadmain()
t=3
AB=sim.getObjectHandle('AB')
BC=sim.getObjectHandle('BC')
CD=sim.getObjectHandle('CD')
Z=sim.getObjectHandle('Z')
sim.setJointTargetPosition(AB,0)
sim.setJointTargetPosition(BC,0)
sim.setJointTargetPosition(CD,0)
sim.setJointTargetPosition(Z,0)
sim.wait(t)
sim.setIntegerSignal("pad_switch",1)
sim.setJointTargetPosition(Z,-0.09)
sim.wait(t)
sim.setJointTargetPosition(Z,0)
sim.wait(t)
moving(0.2,0.7)
sim.wait(t)
sim.setIntegerSignal("pad_switch",0)
sim.wait(t)
sim.setIntegerSignal("pad_switch",1)
sim.wait(t)
sim.setJointTargetPosition(Z,-0.09)
sim.wait(t)
sim.setJointTargetPosition(Z,0)
sim.wait(t)
moving(-0.3,-0.55)
sim.wait(t)
sim.setIntegerSignal("pad_switch",0)
end
end
|
AB.BC.CD.Z對應為軸的名稱
moving(0.2,0.7)、moving(-0.3,-0.55)為指定位置
5.Python remote API 逆向運動學函式
操作影片:
import sim as vrep
import math
import random
import time
import math
def moving(x,y):
a=0.5
b=0.5
c=math.pow((math.pow(x,2)+math.pow(y,2)),0.5)
s=(a+b+c)/2
area=math.pow((s*(s-a)*(s-b)*(s-c)),0.5)
h=area/(2*c)
deg1_base=math.atan(x/y)
if x<0 and y<0 :
deg1_base=deg1_base+math.pi
deg1_tri=math.asin(h/a)
deg1=deg1_base+deg1_tri
deg2=math.pi-(0.5*math.pi-deg1_tri)-math.acos(h/b)
deg3=deg2-deg1
vrep.simxSetJointTargetPosition(clientID,joint1,deg1,opmode)
vrep.simxSetJointTargetPosition(clientID,joint2,- deg2,opmode)
vrep.simxSetJointTargetPosition(clientID,joint3,deg3,opmode)
print ('Start')
vrep.simxFinish(-1)
clientID = vrep.simxStart('127.0.0.1', 19997, True, True, 5000, 5)
if clientID != -1:
print ('Connected to remote API server')
res = vrep.simxAddStatusbarMessage(
clientID, "This is teach by 40823214 ",
vrep.simx_opmode_oneshot)
if res not in (vrep.simx_return_ok, vrep.simx_return_novalue_flag):
print("Could not add a message to the status bar.")
opmode = vrep.simx_opmode_oneshot_wait
STREAMING = vrep.simx_opmode_streaming
vrep.simxStartSimulation(clientID, opmode)
ret,AB=vrep.simxGetObjectHandle(clientID,"AB",opmode)
ret,BC=vrep.simxGetObjectHandle(clientID,"BC",opmode)
ret,CD=vrep.simxGetObjectHandle(clientID,"CD",opmode)
ret,Z=vrep.simxGetObjectHandle(clientID,"Z",opmode)
vrep.simxSetJointTargetPosition(clientID,AB,0,opmode)
vrep.simxSetJointTargetPosition(clientID,BC,0,opmode)
vrep.simxSetJointTargetPosition(clientID,CD,0,opmode)
vrep.simxSetIntegerSignal(clientID,"pad_switch",1,opmode)
vrep.simxSetJointTargetPosition(clientID,Z,-0.09,opmode)
time.sleep(1)
vrep.simxSetJointTargetPosition(clientID,Z,0,opmode)
while True:
moving(0.2,0.7)
time.sleep(1)
vrep.simxSetIntegerSignal(clientID,"pad_switch",0,opmode)
time.sleep(1)
vrep.simxSetIntegerSignal(clientID,"pad_switch",1,opmode)
vrep.simxSetJointTargetPosition(clientID,Z,-0.09,opmode)
time.sleep(1)
vrep.simxSetJointTargetPosition(clientID,Z,0,opmode)
moving(-0.3,-0.55)
time.sleep(1)
vrep.simxSetIntegerSignal(clientID,"pad_switch",0,opmode)
time.sleep(1)
vrep.simxSetIntegerSignal(clientID,"pad_switch",1,opmode)
vrep.simxSetJointTargetPosition(clientID,Z,-0.09,opmode)
time.sleep(1)
vrep.simxSetJointTargetPosition(clientID,Z,0,opmode)
心得:
在這次考試前,我對onshape還不熟,因為平時都是使用inventor,藉由這次的考試讓我對這個免費的網頁繪圖更加的熟悉,再多次操作後,對其相關的功能運用更加的了解
再先前小組分組中雖然有操作CoppeliaSim的經驗,但當時使用到的機構比較少也沒接觸到程式的部分,但在這次的考試,我對於軟體的機構有更深入的認識,也因為製作的過程失敗很多次,所以我在最後成功組裝零件只需要花費不到10分鐘就可以完成,但仍有其他需要學習的機構
但程式碼的部分是在同學分享的影片中學習到的,且還沒有很熟悉,希望自己可以增強程式方面的運用
謝謝老師與同學的影片幫助,讓我在家裡也可以播放影片學習
WEEK15 <<
Previous Next >> Final Report